Ideas for Educators
  • Home
  • Idea Blog
  • Professional Learning Topics
  • Books & Videos
  • Free Resources

Improving Thinking Skills through Part-Whole Structures

1/29/2020

0 Comments

 
Are your students SPLUMPERS? Derek Cabrera, in Thinking at Every Desk, suggests that students need to combine the skills of SPLITTERS and LUMPERS in order to be successful thinkers. Here is how that played out in one of my lessons this week. 

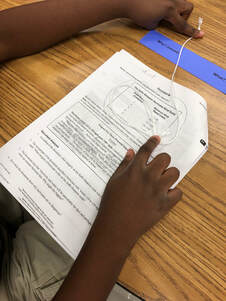
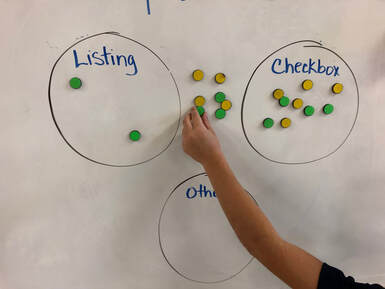
The lesson learning target was “I can identify the structure of a text passage to help with my comprehension.” Students have been exploring text structures for several lessons and have been taught the key words that might signal a chronology vs. problem/solution, etc. What we noticed is that some students were getting too caught up in the key words and misidentifying the structure. They were SPLITTERS – looking at the part without looking at the whole. 

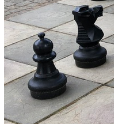
To help students see the need to look at part and whole, we began by showing them several images – one whole and one a zoomed in part – and had discussion about why it might be important to see both. For example, with a photo of African Stew and a peanut, we were able to talk about peanut allergies as a strong reason to look at parts. With a photo of a chess board, we discussed why the whole picture told a more interesting story than the part. Download images here, if you would like all eight. 

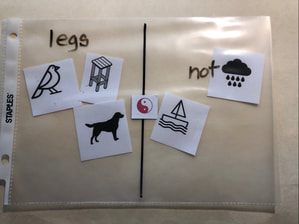
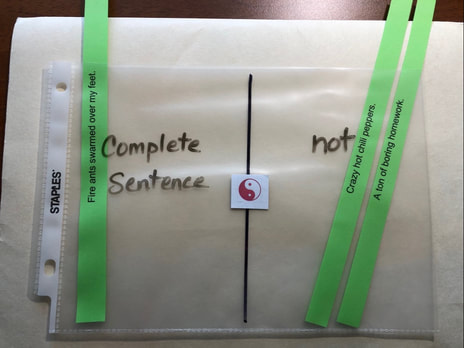
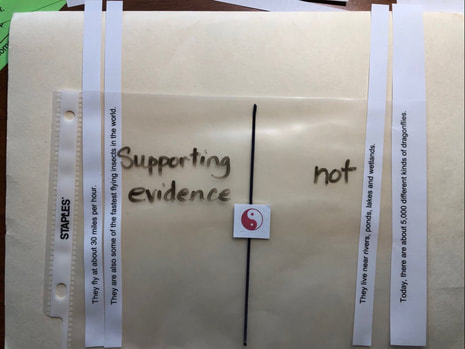
Next, we assigned partners, each being either a SPLITTER or a  LUMPER. The SPLITTER used wikkistix to circle key workds, while the LUMPER read the whole passage. They then discussed what they noticed and decided which text structure it represented. 

We also added gestures and visuals to go along with the thinking process. Download those here. 

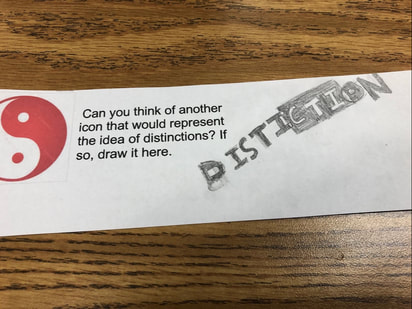
This concept can be applied to so many things we teach!
 "All knowledge has a part-whole structure, and therefore to understand it, we must see the part-whole structure of each and every idea we encounter."
​D. Cabrera

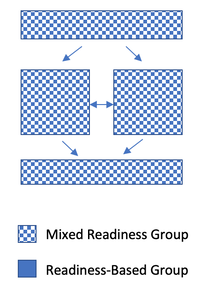
​Even the U.S. Army considers this work essential!
0 Comments

Teaching Inferencing Skills with Evidence-Based Strategies

12/17/2019

0 Comments

 
We have a solid evidence base for instructional strategies that enhance inferencing skills. After reviewing the conclusions made by this report, I crafted a scaffolded lesson that focused on two of the strategies – Missing Pieces and. Because of the nature of my work, I combined both of these into one lesson, however each piece should be practiced over multiple opportunities. 

Our learning target was “I can draw inferences from text.” We practiced a three-part gesture for “infer” that included the left hand over the face, adding the thinking gesture at the chin and then an “I got it!” gesture at the end. This emphasizes that when making an inference, you can’t see an entire picture so you have to think before making an educated guess. (See photos.)
​​Missing Pieces
Scaffolded instruction came next. Students were guided in making inferences about
  1. Complete photos
  2. Incomplete photos
  3. Incomplete sentences
  4. Complete sentences
Teacher modeling included asking questions about what they were inferring but also, “How do you know?” “What makes you think so?”  and “What life experience is helping you reach that inference?” See photo and sentence examples below. Do as many of these as you feel your students need, adjusting for readiness/grade level.
  • Yasmine was _______ as her mother tried to comfort her. 
  • The wind was so strong that the tree _______________.
  • Everyone “oohed” and “ahhed” as the sky lit up but the dogs barked with each loud bang.
  • In the kitchen, Luis was looking at his feet as his mother held up the broken pieces.

Student Generated Inference Questions

Then we moved to short paragraphs and asked students to read, generate inferences and then turn them into questions. For example, in this paragraph, inference questions might include:

When I got to school this morning, all of the teachers were hurrying around to get us ready to leave. “Did you all put your lunches in the cooler? If you brought sunscreen, please bring it to me.” The teachers are checking their lists and making sure we have everything we need. 
  • Why are the teachers hurrying?
  • Where are they going?
  • What will the weather be like?
  • Will they be inside or outside?
  • How many classes are going?
 
To boost engagement, we broke into two teams. Each team generated inference questions and placed them in an envelope. We then swapped the envelopes and had to answer the other team’s questions. 
 
To practice these techniques, you will want to use passages that are complex enough to have inferences at your students’ readiness level, while keeping the vocabulary simple enough to not impede fluency and comprehension. 
 
This hierarchy of practice worked very well for us and we will continue to embed these strategies into other lessons. Knowing that we have an evidence base for this approach makes us confident that we will see student growth with our inference standards. 
0 Comments

Developing Student Reasoning Skills to Choose Text Evidence

11/4/2019

0 Comments

 
Like teachers everywhere, my co-teachers and I have been working on trying to develop students’ ability to find text evidence that supports a claim. The more we work with this, the more we recognize that there are some underlying reasoning and thinking skills that are missing. 
​
Thinking at Every Desk by Derek Cabrera and Laura Colosi is an excellent, quick read that explains the four basic thinking skills that students need – Distinctions, Relationships, Systems and Patterns. The authors use the Yin Yang symbol to capture the interrelatedness of these four categories. 
Picture
Today’s lesson plan focused on Making Distinctions. I created Distinction Pockets for students so that they could practice sorting a variety of items, discussing their reasoning.
How to:
  1. Buy heavy duty page protectors and cut off top third. 
  2. Draw a line down the center with a permanent marker. Mark one side “not.”
  3. If desired, print sticky labels of the YinYang symbol and stick this in the middle (see photo.)
  4. Provide students with a variety of items to sort by making distinctions. As you can see from the full lesson plan, we began with pictures, then moved to words, then to text evidence strips. Each time, have students use a dry erase marker to write on the left side of the pocket whatever the distinction or characteristic is that they will sort by. 
  5. Circulate in the room to monitor what students are placing in each pocket. Because the pockets are see through, the learning is very visible.​
  6. Students can store their pockets in a three-ring binder to use in future lessons. 
Picture
Picture
You will see from the lesson plan, that we also added a challenge component. After explaining what the YinYang symbol represented, we gave a few students the challenge of developing an alternate symbol. In this photo, Ethan created some word art that represents the whole, with the parts as being distinct (I was so impressed with his thinking that I chose to ignore the fact that he left out a letter.) 
Picture
0 Comments

Prove It Bags Grab and Maintain Student Attention

10/22/2019

0 Comments

 
Picture


How many times have you asked students to find text evidence to support their answer? It can become a dry, repetitive, boring task for students and teachers. Today we shook things up a bit by using a simple strategy I called Prove It Bags. As you can see from the photo, all you need to do is grab a brown paper lunch bag (or a few) and label them “Prove It!” 


We then looked at the questions provided with the text and decided that they were too boring – mostly “right there” types of questions, such as 
  • How many wings does a dragonfly have?
  • What do dragonflies eat?

We replaced these with higher level thinking questions for which students would need to find multiple pieces of evidence and use some reasoning skills, such as 
  • What would happen if we had a dragonfly as a class pet? PROVE IT!
  • Why might a dragonfly be called an ace flyer? PROVE IT!
  • What is something dragonflies can’t do? PROVE IT!

Print these on colored paper for a bit of extra pop!

​Last step was to have students pull questions out of the bag and read them aloud to their group. The novelty and mystery of this type of strategy always grabs and maintains interest over just handing the students a worksheet. 

Consider how you might use a Prove It! Bag for your next lesson. 


P.S. I also came up with a really corny chant for the students. Depending on the age of your students, and your own style, you might want to give it a try. 

​Don't be a goof
Find some proof!
One piece is okay
But more gets "hurray!"

0 Comments

Finding Evidence that Answers the Question

9/25/2019

0 Comments

 
Picture
Yesterday’s learning target in language arts was:

“I can analyze documents to find text evidence that answers the question.”

As a special educator, my approach to a lesson is to think about IEP goals and how I can transform a lesson to make it more accessible for students. Many students with IEPs have goals related to reading comprehension of expository text. I consider what about the target or lesson will be difficult. Students can usually find text evidence – but it is not always linked directly to the question being asked! So I wanted to emphasize the need to connect text evidence to the question, while infusing the lesson with something engaging and multi-sensory.

Our documents were about hurricanes with the question “Why are hurricanes dangerous?” with a focus on cause vs. effect, or why vs. what. 

We started by sharing the story of Pecos Bill, the cowboy who was so expert at lassoing that he once lassoed a tornado. I brought in a homemade lasso and demonstrated what happened if you throw it but don’t hold on to the rope! We then gave every student their own miniature lasso (string tied with a slip knot) and showed them how they can lasso evidence but have to connect or hold the end to the question. (see photo) They first used the lassos and then circled with pencil the evidence that answered the question, underlining evidence that was more focused on the effects. 
​
Students were highly engaged as they explored the documents, deciding whether the evidence was connected to the “Why” in the original question. I am excited to have one more tool that I can use to make text work more interactive, as well as a memorable analogy to help students make connections. 


0 Comments

Which Strategy Do Students Like Best for Procedural Text?

8/29/2019

0 Comments

 
Picture
​Complex procedural text can be tough to follow, even for the strongest readers. When I am reading lengthy directions that are presented in paragraph form, I sometimes use strategies to help me follow along. My co-teacher and I taught two of these strategies today, while also using colored magnets for group assignments and voting. 

This is a flow map for our group configurations. We started with a co-led whole group activator and then moved into two mixed-readiness groups. Each teacher taught one of the strategies, then students flipped so they received instruction in both. Finally, we came back together for a co-led whole group closure.  Using a flow map like this can illustrate and clarify our plans, guaranteeing that we use a majority of our time for small group instruction. 
Picture
Students were highly engaged from the spilled water activator (see entire lesson plan here) to the magnet voting in our closure. My co-teacher and I will continue to reinforce use of both the List and Checkbox strategies whenever students encounter multi-step directions or procedural text. 

0 Comments

Reading Comprehension Booster

8/28/2019

2 Comments

 
Picture

Are you an elementary teacher or specialist with access to at least one iPad? If so, check out the Reading Comprehension Booster app. 


Based on the idea of paper bookmarks, each booster encourages the child to record responses, while they are reading, based on a specific reading focus. No more wondering if your child or student was actually paying attention while s/he was reading! Teachers can also use the app during a whole group read aloud to show students how to interact with books while reading.

Reading Comprehension Booster bookmarks are based on essential instructional elements identified in literacy, brain and learning research. Each booster has a variety of interactive options to tap into different ability levels and interests. Users can read or listen to directions, draw, type, drag or record responses, and much more. Children can choose from Characters, Connections, Story Seeds and other bookmarks, or use several simultaneously. Children can easily email their work to a parent or teacher for review and support.

"We have evaluated this app and find it to be wonderful! We have included it in two places on our list of Recommended iPad Apps. It is listed on the Must-Have page for Elementary and again on the Language Arts page under Reading Practice. The app is truly excellent and I commend you for it. Thank you for sharing it with us."  Lori Gracey, TCEA Executive Director

2 Comments

Blanket the Table Active Alternative for Brainstorming

7/23/2019

0 Comments

 
Picture
After an exciting week at the National Train the Trainer Institute Co-Teaching that Works, I received a lovely email from one of our participants. As you can see, she had great success with a strategy I shared called Blanket the Table. I have written about it in the past, but thought I would share it again because it works well and requires NO PREP!
​
  1. Each student needs to rip up paper into 4 pieces. I use paper from the recycling bin. 
  2. Place students in heterogeneous groups of five or six. Ask them to stand around a cleared desk. 
  3. Put two minutes on a visual timer.
  4. Explain to the students that the goal is to brainstorm enough ideas to Blanket the Table (cover the desk top.)
  5. When they have an idea, they say it aloud to their group, then write it on their scrap of paper and drop it on the table. We use the phrase "Say it, Write it, Drop it."
  6. Give the students their brainstorming topic - i.e. types of animals, countries in Africa, etc. – about ten seconds of silent think time and then say, "Go!" as you start the clock. 
  7. When time is up, ask the students to give their teammates a High Five or Fist bump. 
  8. At this point you can choose to have students prioritize or categorize their ideas, share their favorites aloud, or just move ahead with the lesson. 

Our next Train the Trainer Institutes will be in Boston, December 10-13, 2019 and in Anaheim, January 21-24, 2020. More information and registration details can be found at http://www.ber.org/seminars/CourseInfo.cfm?seid=VXB0F1-BOS
 
0 Comments

Word Toss Vocabulary Practice

7/15/2019

0 Comments

 
Picture
I recently received a request for my Word Toss sheet, so I thought I would post my original description of this vocabulary activity from 7 years ago. Enjoy!


To mix things up a bit, last week I asked a co-teacher to replace her use of the Frayer Model in algebra with a Word Toss activity. We placed students into pairs and provided each pair with a die and a Word Toss worksheet. Students were directed to role the dice and perform the task associated with the number on the face of their die.

Picture
The change in routine increased alertness by adding some novelty and tactile interaction to the lesson. Afterward, my co-teacher and I brainstormed alternative tasks that could go on the Word Toss worksheet:
  • Act it out
  • Develop a metaphor
  • Develop an analogy
  • Create a multiple choice question
  • Perform word surgery (dissect into root, prefix, suffix)
  • Transform it (add prefix or suffix)
  • Career Track it (think of a job for which you would need this word)
  • Create a crossword clue
0 Comments

FREE Tool for Turning Photos into Posters

5/29/2019

0 Comments

 
Picture
I know summer vacation is just starting, but...When you begin to think about decorating your classroom for next school year, check out this FREE tool!

Rasterbator.net (horrible name, although it is memorable) allows you to upload your own photos and turn them into multi-page posters of any size. It splits the image into multiple pages that you then trim and tape together.

​Super convenient for anyone traveling to a conference or working in a variety of spaces – just pack the poster in a file folder! Students could print posters from photos they take for a school project. Keep in mind that it will use a lot of ink, depending on your final product size. You can also print in black and white if you don’t have a color printer.  

0 Comments
<<Previous
Forward>>

    Anne M. Beninghof

    Anne's mission is to improve instruction through collaboration and the sharing of creative, practical ideas for educators.

    RSS Feed

    Archives

    October 2022
    April 2022
    February 2022
    October 2021
    September 2021
    June 2021
    May 2021
    April 2021
    February 2021
    November 2020
    September 2020
    May 2020
    April 2020
    March 2020
    February 2020
    January 2020
    December 2019
    November 2019
    October 2019
    September 2019
    August 2019
    July 2019
    May 2019
    April 2019
    March 2019
    February 2019
    January 2019
    November 2018
    October 2018
    September 2018
    August 2018
    July 2018
    June 2018
    May 2018
    April 2018
    March 2018
    February 2018
    January 2018
    December 2017
    November 2017
    October 2017
    September 2017
    August 2017
    June 2017
    May 2017
    April 2017
    March 2017
    February 2017
    January 2017
    December 2016
    October 2016
    September 2016
    August 2016
    July 2016
    June 2016
    May 2016
    April 2016
    March 2016
    February 2016
    January 2016
    December 2015
    November 2015
    October 2015
    September 2015
    August 2015
    July 2015
    June 2015
    May 2015
    April 2015
    March 2015
    February 2015
    January 2015
    December 2014
    November 2014
    October 2014
    September 2014
    August 2014
    July 2014
    June 2014
    May 2014
    April 2014
    March 2014
    February 2014
    January 2014
    December 2013
    November 2013
    October 2013
    September 2013
    August 2013
    July 2013
    June 2013
    May 2013
    April 2013
    March 2013
    February 2013
    January 2013
    December 2012
    November 2012
    October 2012
    September 2012
    August 2012
    July 2012
    June 2012
    May 2012
    April 2012
    March 2012
    February 2012

    Categories

    All
    Accessibility
    Accommodation
    Acquisition
    Activator
    Attention
    Automaticity
    Collaboration
    Connections
    Cooperative
    Co Teaching
    Co-teaching
    Differentiation
    Engagement
    Higher Order Thinking
    Inclusion
    Literacy
    Math
    Memory
    Metaphor
    Movement
    Multi Sensory
    Multi Sensory
    Multi-sensory
    Novelty
    Organization
    Planning
    Questioning
    Reflection
    Review
    Special Education
    Special Education
    Summarization
    Technology
    Visual Supports
    Visual Supports
    Vocabulary

    RSS Feed